The GoHighLevel Agency plan costs $297/month and is designed for growing agencies that want to manage multiple clients without worrying about sub-account limitations. This plan offers you unlimited sub-accounts, white-label desktop branding, and SaaS features that transform how agencies operate.
It eliminates the constant math of per-client costs, letting you focus on growth rather than budgets.
What Makes the GoHighLevel Agency Plan Different
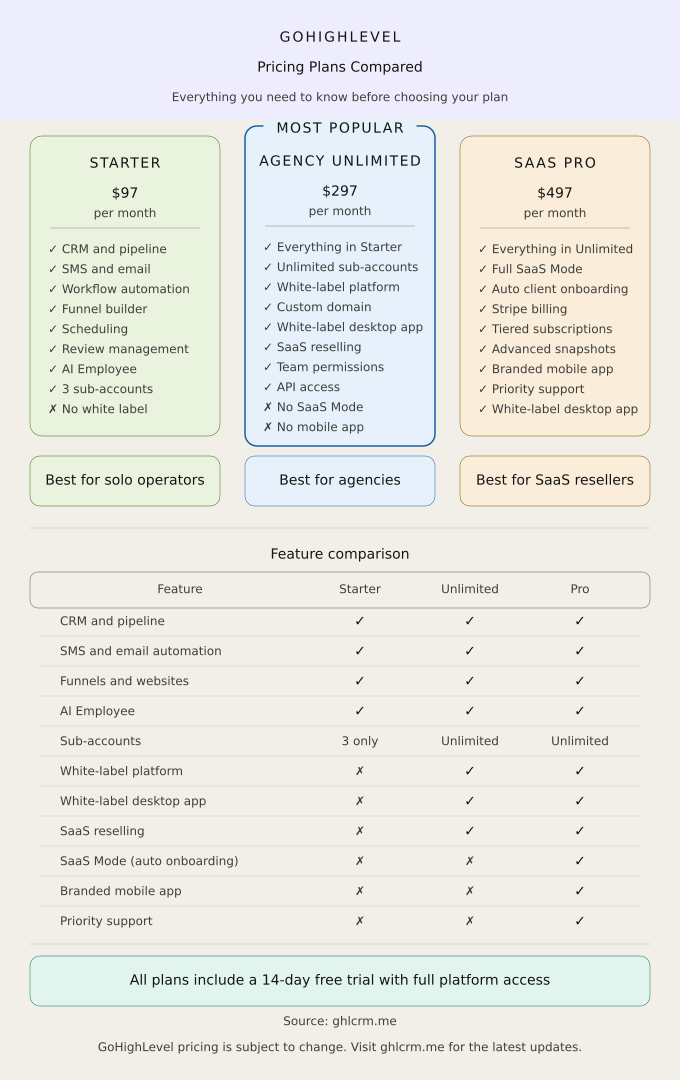
GoHighLevel agency plan sits between the entry-level Starter plan at $97/month and the premium SaaS Pro plan at $497/month. While Starter restricts you to just three sub-accounts, this tier removes all limitations.
Create 10, 50, or 100 client accounts without seeing your monthly fee increase by a single dollar.
This pricing structure fundamentally changes agency economics. Traditional CRM platforms charge per user, per contact, or per client account.
With Agency Unlimited, your software costs stay flat regardless of growth. Onboard your fifth client or your fiftieth, and your platform investment remains $297 monthly.
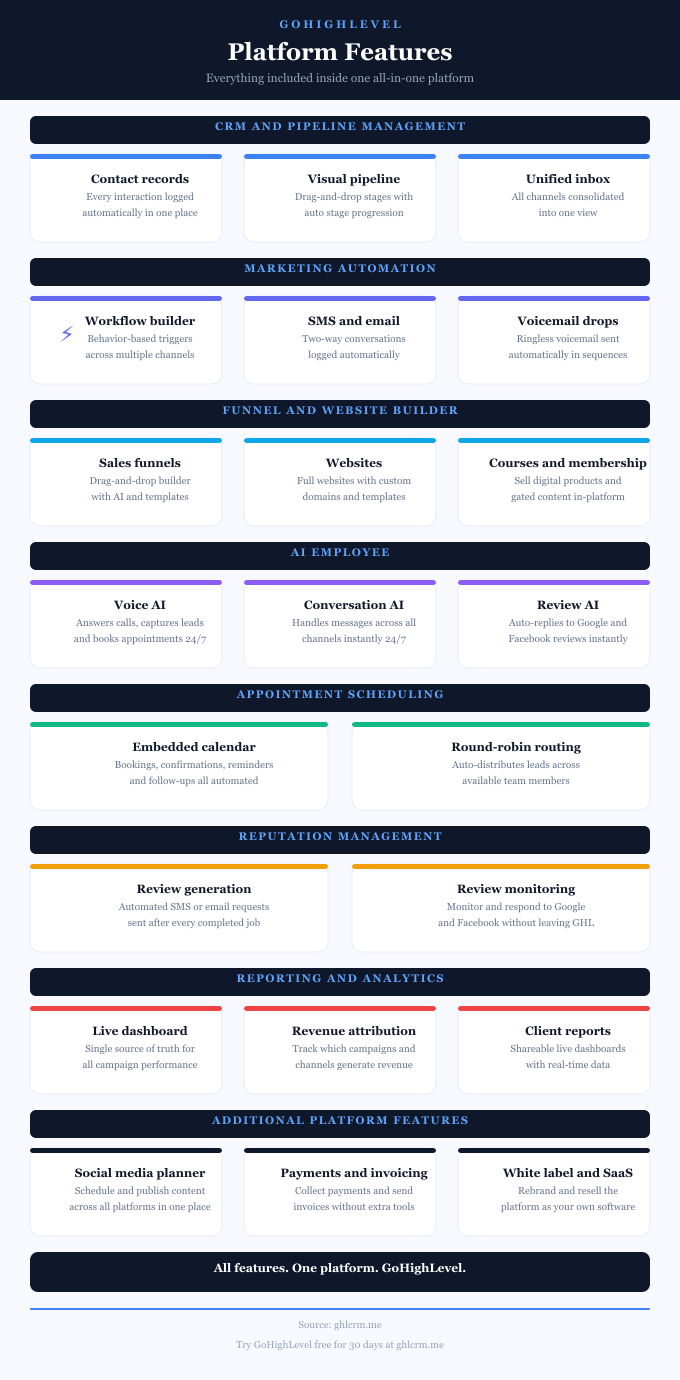
Core Features of the GoHighLevel Agency Unlimited Plan
Unlimited Sub-Accounts
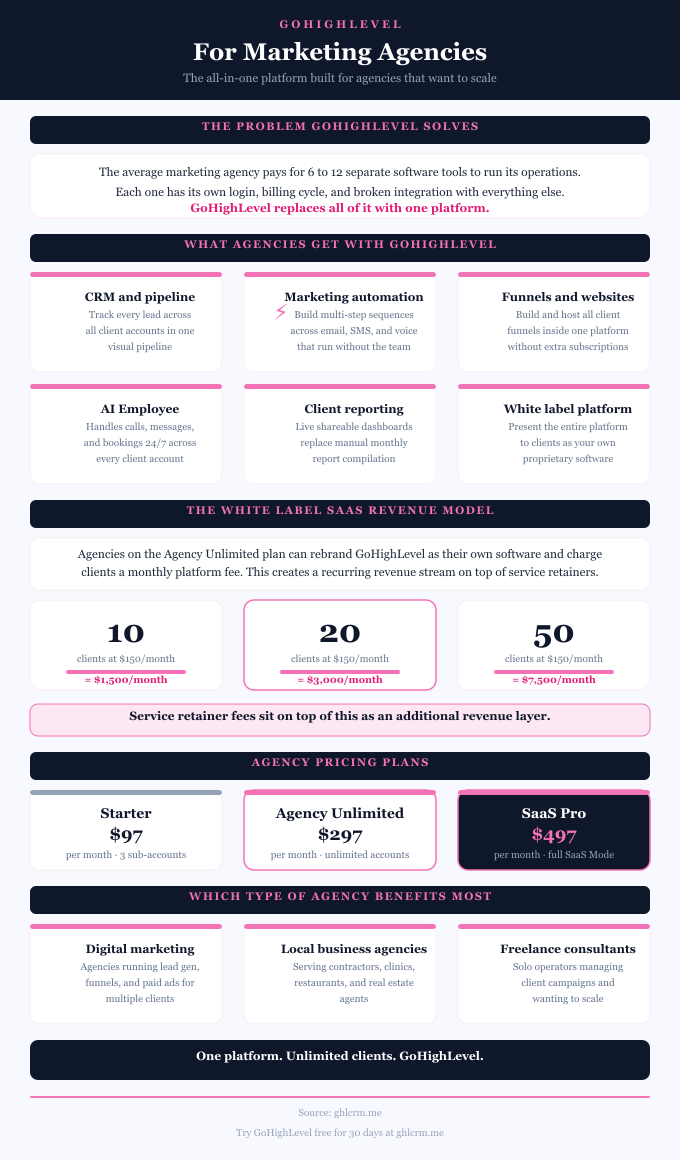
This forms the foundation of GoHighLevel Agency Unlimited’s value proposition. Each client receives their own isolated environment with separate contacts, funnels, campaigns, and data. No cross-contamination, no shared dashboards, no confusion. You manage everything from a master agency dashboard, while clients see only their own branded portal.
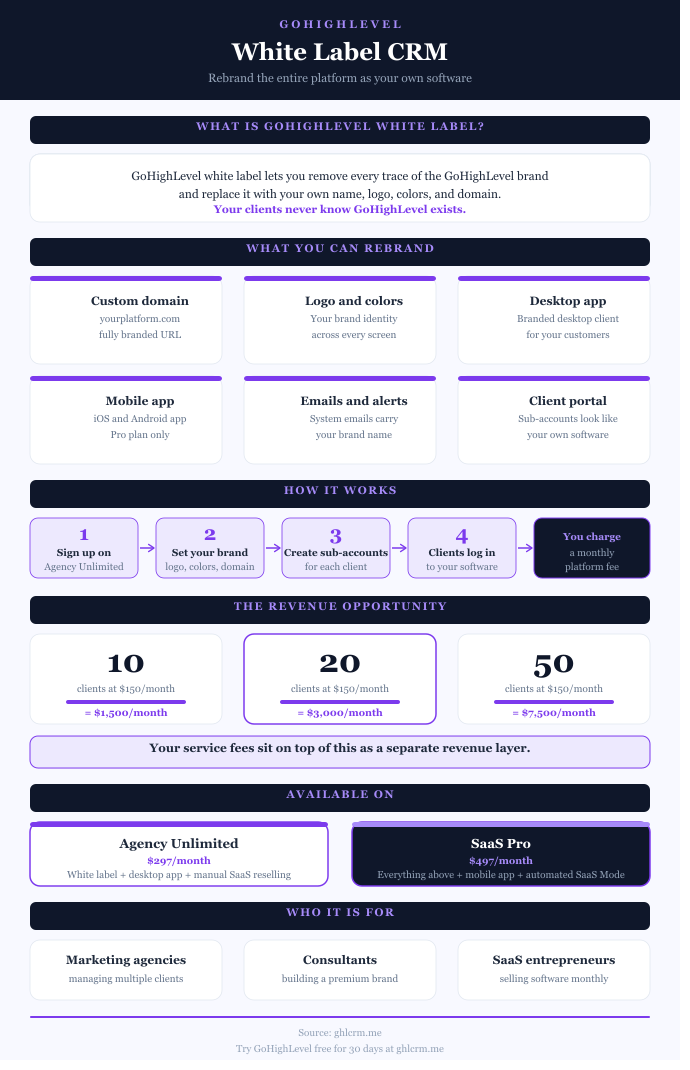
White-Label Desktop Application
It lets you rebrand the entire platform with your logo, colors, and custom domain. When clients log into app.youragency.com, they see your branding throughout their experience. GoHighLevel remains completely invisible, positioning you as the software provider rather than a reseller.
Complete CRM Suite
It includes pipeline management with unlimited custom pipelines, contact tracking with 360-degree customer views, opportunity stages with drag-and-drop deal management, task automation and assignment, and custom fields for any data point. Every sub-account receives full CRM capabilities without restrictions.
Marketing Automation Tools
This feature provides a workflow builder with multi-channel sequences, unlimited email marketing sends, two-way SMS campaigns, social media scheduling across major platforms, and form and survey builders. The automation depth supports complex campaigns that coordinate email, SMS, and social engagement based on behavioral triggers.
Website and Funnel Builders
It enables the creation of professional websites and conversion funnels using a drag-and-drop interface. The template library includes hundreds of pre-built designs for various industries. A/B testing capabilities help optimize conversion rates systematically.
Appointment Scheduling System
The scheduler replaces Calendly or Acuity with native calendar management. Features include automated reminders via SMS and email, team calendars with round-robin assignment, payment collection at booking, and sync with Google and Outlook calendars.
LC Phone System
It provides built-in telephony without third-party providers. Call recording for quality control, call tracking with source attribution, voicemail drops for efficient follow-up, and IVR for intelligent call routing come standard. This eliminates $50-200 monthly phone system subscriptions.
Membership and Course Platform
It allows you to host online courses with unlimited lessons, modules, and students. Drip content scheduling, quizzes and assessments, and certificates create complete learning environments. This replaces Teachable or Kajabi at $99-199 monthly.
Basic API Access
This enables custom integrations with specialized tools or proprietary systems. Build connections to industry-specific software, create custom automations, and extend platform capabilities beyond standard features.
What’s Not Included in the Agency Plan
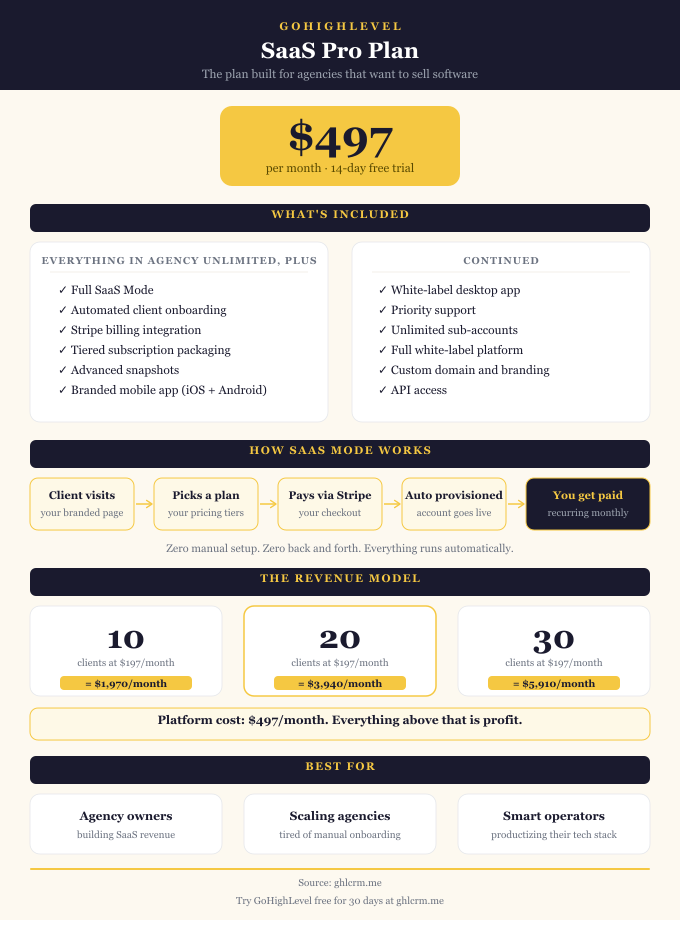
The GoHighLevel Agency plan provides comprehensive tools but falls short of the full SaaS-mode capabilities. You cannot set custom pricing tiers for clients, automate client billing through the platform, or create white-label mobile apps. These features require upgrading to the $497 monthly SaaS Pro plan.
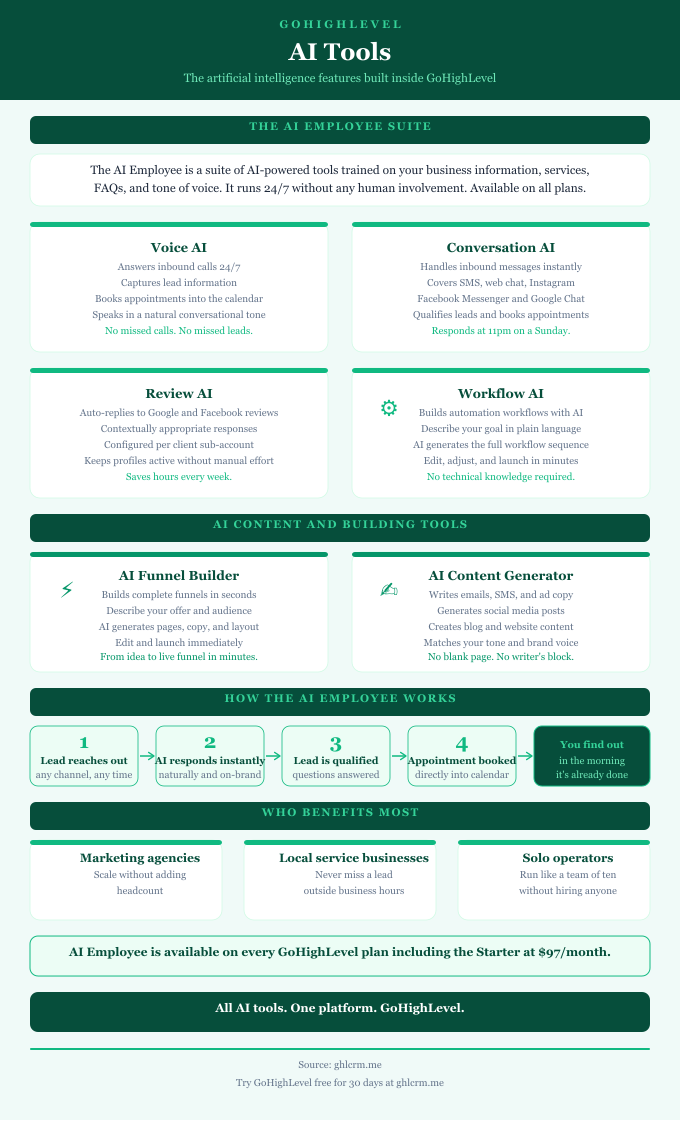
Additionally, communication and AI employee usage costs that can be manually rebilled in the respective clients’ accounts are billed separately. SMS messages cost approximately $0.0079 per segment, phone calls run $0.0085-$0.014 per minute, and email sending costs $0.675 per 1,000 emails. Phone numbers cost $1.15 each per month.
Access to Voice AI, Conversation AI, Reviews AI, Content AI, Funnel AI, and Workflow AI costs $97 monthly for unlimited usage or pay-per-use pricing starting at $0.02-0.13 per action.
Real-World Agency Economics
Understanding actual costs versus revenue potential reveals Agency Unlimited’s financial leverage.
10-Client Agency Example:
Your agency manages 10 local businesses, each paying $297 per month for CRM access and $500 per month for marketing services. Monthly revenue totals $7,970.
Your software costs include the $297 Agency Unlimited subscription and approximately $150 in communication usage, totaling $447 per month. Software gross profit reaches $7,523 monthly or $90,276 annually.
25-Client Agency Example:
Scaling to 25 clients at the same price point generates $19,925 in monthly revenue. Software costs remain essentially flat at approximately $297 base plus $350 usage, totaling $647 monthly. Gross profit expands to $19,278 monthly or $231,336 annually. Your software cost per client drops from $44.70 to just $25.88 as you scale.
50-Client Agency Example:
At 50 clients charging $297 each for software, revenue reaches $14,850 monthly from software subscriptions alone, before service fees. Platform costs might reach $297 base plus $600 usage, totaling $897 monthly. Software profit exceeds $13,953 monthly or $167,436 annually.
The mathematical reality is clear. Agency Unlimited’s flat fee means margins improve as you grow, rather than eroding as they do with traditional per-client pricing models.
Annual Billing Advantage
GoHighLevel offers approximately 16% savings through annual billing, equivalent to receiving two free months. The yearly Agency Unlimited cost is $2,970 instead of $3,564 if paid monthly, saving $594 annually. For agencies confident in their commitment, annual billing improves cash flow predictability while reducing costs.
Who Should Choose GoHighLevel Agency Unlimited
Growing Agencies managing 4-15 clients find that Agency Unlimited provides room for expansion without immediate upgrade pressure. The unlimited sub-accounts accommodate growth spurts when you sign multiple clients quickly.
Marketing Consultants transitioning from freelance work to agency models benefit from a professional infrastructure that supports client growth. The white-label branding positions you as an established software provider rather than a solo operator.
Service-based businesses managing multiple locations can use sub-accounts to separate each location while maintaining centralized oversight. Real estate teams, multi-location medical practices, and franchise operations leverage this structure effectively.
Digital Agencies that offer comprehensive services appreciate consolidating CRM, email marketing, funnel building, appointment scheduling, and phone systems onto a single platform. Tool consolidation reduces operational complexity and cuts software costs by $500-1,000 per month compared to separate subscriptions.
Migration from Starter Plan
Agencies that start on the $97 Starter plan to learn the platform often upgrade to Agency Unlimited within 30-90 days as client rosters grow. The upgrade process is seamless. Existing sub-accounts, contacts, workflows, and campaigns transfer automatically. You can immediately begin creating additional sub-accounts after upgrading.
There’s no penalty for starting small. Many successful agencies operated on Starter for their first 2 clients before scaling justified the additional $200 monthly investment. The key decision point typically arrives when signing your third client, as Starter only supports three sub-accounts (1 for your business and 2 for clients).
When to Consider SaaS Pro
If you’re building an actual software business where clients perceive they’re purchasing your proprietary platform rather than agency services, SaaS Pro at $497/month is worth considering. This tier adds SaaS Mode with custom pricing tiers, automated client billing through Stripe, white-label mobile apps for iOS and Android, and advanced rebilling controls.
The decision usually hinges on scale and business model. Agencies managing 15-20+ clients where software subscriptions generate $5,000+ monthly often upgrade to SaaS Pro. The additional $200 monthly investment unlocks capabilities that professional software companies require and significantly improves perceived value.
However, most agencies have thrived on Agency Unlimited for years. The plan supports sophisticated operations without forcing unnecessary upgrades. Only when you’re actively building a SaaS business with custom pricing tiers does the Pro plan become essential.
Setup and Onboarding Strategy
Maximizing Agency Unlimited requires systematic implementation after signing up for an account, rather than a reactive setup.
Week 1: Foundation Configuration
Connect your custom domain for white-label access. Upload your agency logo and configure brand colors throughout the interface. Integrate your Stripe account for payment processing.
Set up LC Phone with dedicated numbers for your agency and initial clients. Configure agency email settings to ensure system communications originate from your domain.
Week 2: Template Development
Create industry-specific snapshots containing pre-built funnels, email sequences, SMS campaigns, automation workflows, pipeline stages, and forms. These snapshots deploy instantly to new client sub-accounts, providing immediate value rather than requiring a new start each time.
Week 3: Client Migration
If transitioning existing clients from other platforms, begin systematic migrations. Export contact data from previous CRMs, import contacts into GoHighLevel sub-accounts, rebuild essential email templates and automations, recreate landing pages and funnels, and train clients on new interfaces.
Week 4: Optimization and Documentation
Document standard operating procedures for everyday tasks, create video tutorials for client training, establish support workflows for handling client questions, and refine your snapshot templates based on initial client feedback.
Most agencies complete foundation setup in 10-15 hours of focused work. Client migrations initially add 2-3 hours per client, though this accelerates as you develop efficient processes and reusable snapshots.
Support and Training Resources
Agency Unlimited includes access to GoHighLevel’s extensive support ecosystem. The knowledge base contains hundreds of articles covering setup, troubleshooting, and optimization.
Video tutorials walk you through complex features step by step. The Facebook community exceeds 50,000 members who share strategies, templates, and solutions.
Email and chat support respond to technical questions, though response times vary based on complexity. The GoHighLevel Academy provides structured training on platform mastery, covering everything from basic setup through advanced automation strategies.
GoHighLevel Bootcamp offers intensive training covering agency setup, client onboarding, snapshot creation, and revenue optimization. While requiring separate enrollment, many agencies credit the Bootcamp with dramatically shortening their learning curve.
GoHighLevel Unlimited Plan: Final Verdict
GoHighLevel Agency Unlimited is of immense value to agencies managing multiple clients who need professional white label infrastructure without SaaS-level complexity. The unlimited sub-accounts, comprehensive feature set, and flat-rate pricing create agency economics that improve as you grow rather than deteriorate.
For $297 monthly, you receive enterprise-level marketing automation, CRM, communication tools, and client management capabilities that would typically require $1,500-3,000 monthly across multiple platforms.
The 30-70x potential return on investment through client software subscriptions transforms Agency Unlimited from an expense to a profit center.