The GoHighLevel sign up process is easier than you think. I remember when I first looked at the platform, thinking it would take days to get everything configured.
Turns out, creating an account on the platform took me less than ten minutes, and I was already exploring features within the hour.
If you’re wondering how to sign up for GoHighLevel and adequately set up your account after creating it, this guide walks you through everything step by step.
How to Sign Up for GoHighLevel
The GoHighLevel account sign-up process is straightforward. Here’s exactly how to create your account using an exclusive 30-day free trial:
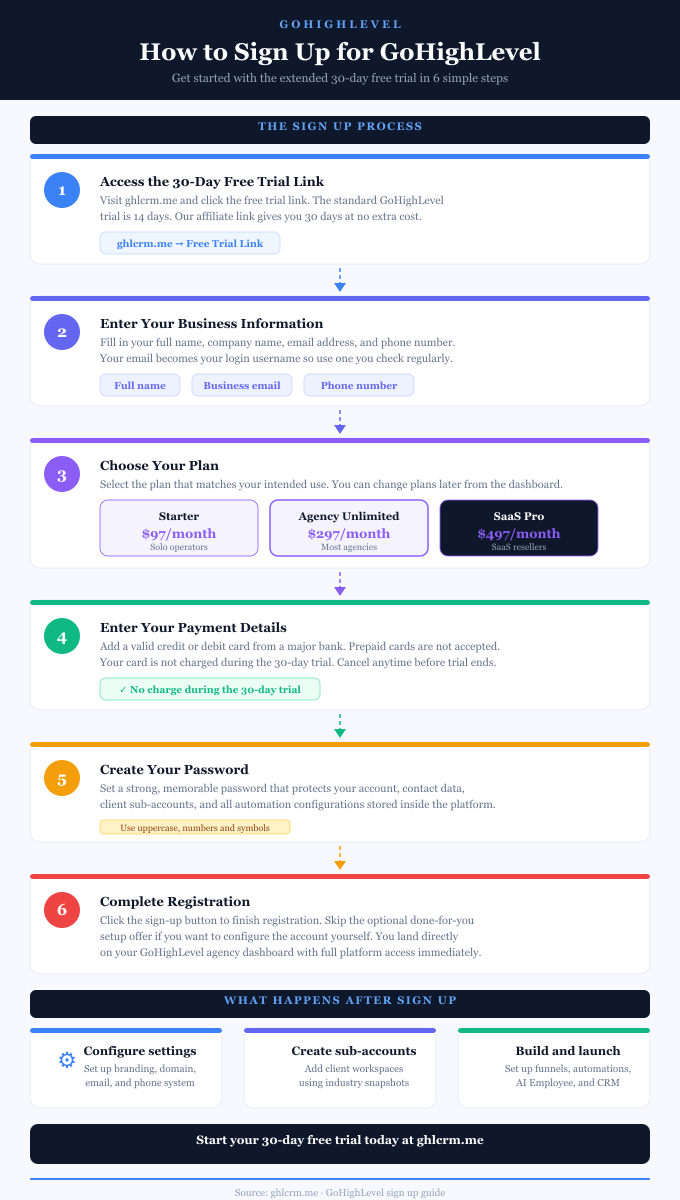
Step 1: Access the 30-Day Free Trial Link
Use this extended 30-day free trial link. The standard trial from GoHighLevel’s main website is only 14 days, but I’ve secured an exclusive partner link that gives you 30 days instead. This extra time is crucial for properly testing the platform and building real campaigns.
Step 2: Enter Your Basic Information
You’ll see a signup form asking for your name, company name, email address, and phone number. Your email becomes your login username, so use one you check regularly. Fill everything out accurately.
Step 3: Select Your Plan
Choose which pricing plan you want to trial. Most people pick either the Starter plan ($97/month) or the Unlimited plan ($297/month).
If you want to sign up for the SaaS pricing plan, you can start with Agency Unlimited and upgrade to the Pro plan from your dashboard. Don’t worry too much about this choice because you can change plans later. During the trial, you get full access to whichever plan you selected.
Step 4: Add Payment Details
Enter your credit or debit card information. You won’t be charged during the 30-day trial period. Billing starts only after your trial ends, and you can cancel at any time before then. Use a regular credit card from a major bank because GoHighLevel doesn’t accept prepaid cards.
Step 5: Create Your Password
Set a strong password for your GoHighLevel account. Make it secure yet memorable to protect all your client data.
Step 6: Complete Registration
Click the final button to finish your account setup. You might see an optional offer for done-for-you setup services, but this costs extra and isn’t required. You can skip it.
That’s it. You now have a GoHighLevel account and should be taken directly to your dashboard.
GoHighLevel Agency Account Setup
Once your account is created, you land in your Agency View dashboard. This is your master control center for managing everything.
Here’s exactly what to do next to properly configure your GoHighLevel agency account.
Step 1: Complete the LaunchPad Onboarding
After logging in, you’ll see the LaunchPad feature with guided onboarding steps. This presents short video tutorials for essential setup steps.
Click on each action relevant to your needs, watch the tutorial, and complete the setup. The LaunchPad tracks your progress automatically as you finish each task.
Step 2: Configure Your Agency Company Settings
Click the Settings gear icon at the bottom-left of your navigation panel and select Company Settings. Here you’ll set up three critical areas:
In the Basic Details tab, enter your agency name, business address, contact email, phone number, and website.
This information appears in client-facing areas like login portals and email templates. Select your timezone to ensure automated messages are sent at the correct times.
In the Whitelabel tab, upload your agency logo that will appear on the login portal and dashboard. Add your custom domain so clients can access the platform through your branded URL instead of the default GoHighLevel domain.
This tab also lets you add custom CSS code to match your brand colors and styling. The Advanced Settings tab controls security preferences like session timeouts and other technical configurations you can adjust based on your needs.
Step 3: Connect Your Payment Gateway
Go to Settings, then Payments. Click “Connect Stripe” or your preferred payment processor. You’ll need this connected to collect client payments, process booking fees, and handle subscription billing if you’re using SaaS Mode.
Follow the prompts to authorize the connection between GoHighLevel and your Stripe account.
Step 4: Set Up Email Services
Navigate to Settings and find Email Services. Connect your SMTP provider like Mailgun or SendGrid for optimal email deliverability. If you don’t have one yet, you can sign up for Mailgun directly through GoHighLevel.
This ensures your automated emails actually reach clients’ inboxes instead of spam folders. Configure your sending domain and verify it following the provided instructions.
Step 5: Configure Your Phone System
If you plan to use calls, SMS, or voicemail features, go to Settings and select Phone Numbers. Purchase a dedicated number for your agency through the LC Phone System integrated into GoHighLevel.
This number handles all your voice and text communications within the platform. Set up your voicemail greeting and configure call forwarding options.
Step 6: Add Team Members
Go to Settings, then Team or My Staff. Click “Add Employee” to create accounts for your team members. Enter their name, email, and personal information. Set their user type to either Agency (for full access) or Account (for sub-account specific access).
Configure permissions by toggling access to different platform areas based on their role. Assign them a phone number if they’ll be handling calls. Set their time zone and work schedule to reflect calendar availability.
Step 7: Create Your First Sub-Account
Sub-accounts are separate workspaces for each client you manage. From your Agency View, click “Sub-Accounts” in the left navigation menu. Click the blue “Add Sub-Account” or “Create Sub-Account” button in the top-right corner.
You’ll see an option to select a Snapshot template. Snapshots are prebuilt setups that include funnels, workflows, email sequences, and pipelines for specific industries such as real estate, gyms, dental practices, and agencies. Select one that matches your client’s industry, or choose “Blank” to start from scratch.
Enter your client’s business information, including name, address, phone number, website, and timezone. Click “Create Sub-Account” to finish. You can now click into this sub-account and start building campaigns, importing contacts, and configuring their specific setup.
Step 8: Customize Your Dashboard
Back in your Agency View, take a moment to arrange your dashboard widgets to show the metrics that matter most to you. You can track total contacts, active conversations, appointment bookings, and pipeline values across all your sub-accounts from this main view.
Step 9: Explore the Snapshot Library
Click on the Snapshots section to browse pre-built templates. Even if you already loaded one for your first sub-account, exploring others gives you ideas for different industries and campaign structures. You can also create custom snapshots once you’ve built campaigns you want to reuse across multiple clients.
Understanding Your Trial Period
Your 30-day trial gives you full access to test everything. During this time, explore the core features:
The CRM stores all your contacts and tracks every interaction. The Conversations inbox unifies all your text messages, emails, and social media messages in one place. The Calendar handles appointment bookings with automated reminders.
Marketing tools let you build funnels and landing pages. Automation workflows run your follow-up sequences on autopilot.
Focus on learning one feature at a time instead of trying to master everything immediately. Pick what solves your biggest problem first.
Creating Sub-Accounts for Clients
If you’re on the Unlimited plan or higher, you can create sub-accounts for each client or business location you manage.
In your Agency View, click “Sub-Accounts,” then “Add Sub-Account.” Enter the business name, address, and timezone. Each sub-account is completely separate, so client data never mixes together.
This structure is perfect for agencies managing multiple clients. You switch between client workspaces instantly while keeping everything organized.
What to Focus On During Your Trial
Use your 30 days wisely:
Week 1: Explore the interface and watch tutorial videos. Get comfortable with where things are located.
Week 2: Build something real using a Snapshot template. Customize it for your actual business needs.
Week 3: Test your setup with real traffic and leads. See how the automation actually performs.
Week 4: Decide if GoHighLevel fits your business before the trial ends.
Getting Support
If you get stuck, GoHighLevel offers several help options:
The in-app chat support is available 24/7. Click the chat icon in your dashboard to ask questions directly.
The Help Center has written guides and video tutorials for most features.
The GoHighLevel Facebook community has over 18,000 members who answer questions quickly.
YouTube has countless third-party tutorials showing real-world implementations.
GoHighLevel Account Creation: Final Words
If you’ve been hesitant to set up a GoHighLevel account, you now know the process is simple. The actual signup takes less than ten minutes. The real learning happens afterward as you explore features and build your systems.
Grab that 30-day trial and see what the platform can do for you.